



The clinical success of an aesthetic injectable treatment is largely determined days before any needle touches your skin. Understanding how to prepare for your first filler appointment isn’t merely about managing expectations; it’s an essential medical protocol that directly governs vascular safety, tissue trauma, and your ultimate aesthetic outcome.
It’s completely understandable to feel apprehensive about visible facial bruising, prolonged swelling, or the fear of looking overdone. With endless conflicting advice regarding which pain relief tablets, daily vitamins, or lifestyle habits increase complication risks, first-time patients often feel overwhelmed before they even set foot in a clinic.
This doctor-led guide reveals exactly how to prepare for your first dermal filler appointment to minimise bruising, protect your safety, and achieve natural results. Ahead, we outline a structured pre-treatment checklist, examine which blood-thinning substances to pause under medical advice, and explain how rigorous anatomical assessment delivers seamless, balanced facial restoration.
Key Takeaways
- Master the clinical timeline on how to prepare for your first filler appointment, identifying which blood-thinning supplements and anti-inflammatory medications must be paused under medical guidance.
- Understand the vital medical contraindications, including why scheduling around dental work and routine vaccinations protects against foreign-body inflammatory responses.
- Learn why doctor-led facial mapping and precise anatomical assessment remain the gold standard for achieving balanced, natural restoration without overfilling.
- Follow strict day-of protocols regarding skin hygiene and hydration to minimise infection risks and facilitate a smooth procedural process.
- Establish realistic recovery expectations and practical aftercare strategies to manage initial swelling, suppress bruising, and protect your clinical outcomes.
Understanding Dermal Fillers: What Happens During Your First Appointment
Learning how to prepare for your first filler appointment begins with demystifying the clinical process itself. A medical-grade aesthetic treatment isn’t an arbitrary series of injections; it’s a rigorous physiological evaluation. During a doctor-led consultation, your clinician analyses underlying bone resorption, deep fat pad migration, and dynamic muscular contraction across the entire face.
The appointment follows a methodical clinical progression. Your doctor reviews your comprehensive health history, confirms informed consent, and performs detailed vascular mapping across target anatomical landmarks. Only once this structural blueprint is established does the precise administration take place, ensuring both tissue safety and subtle restoration.
The Science of Hyaluronic Acid Fillers
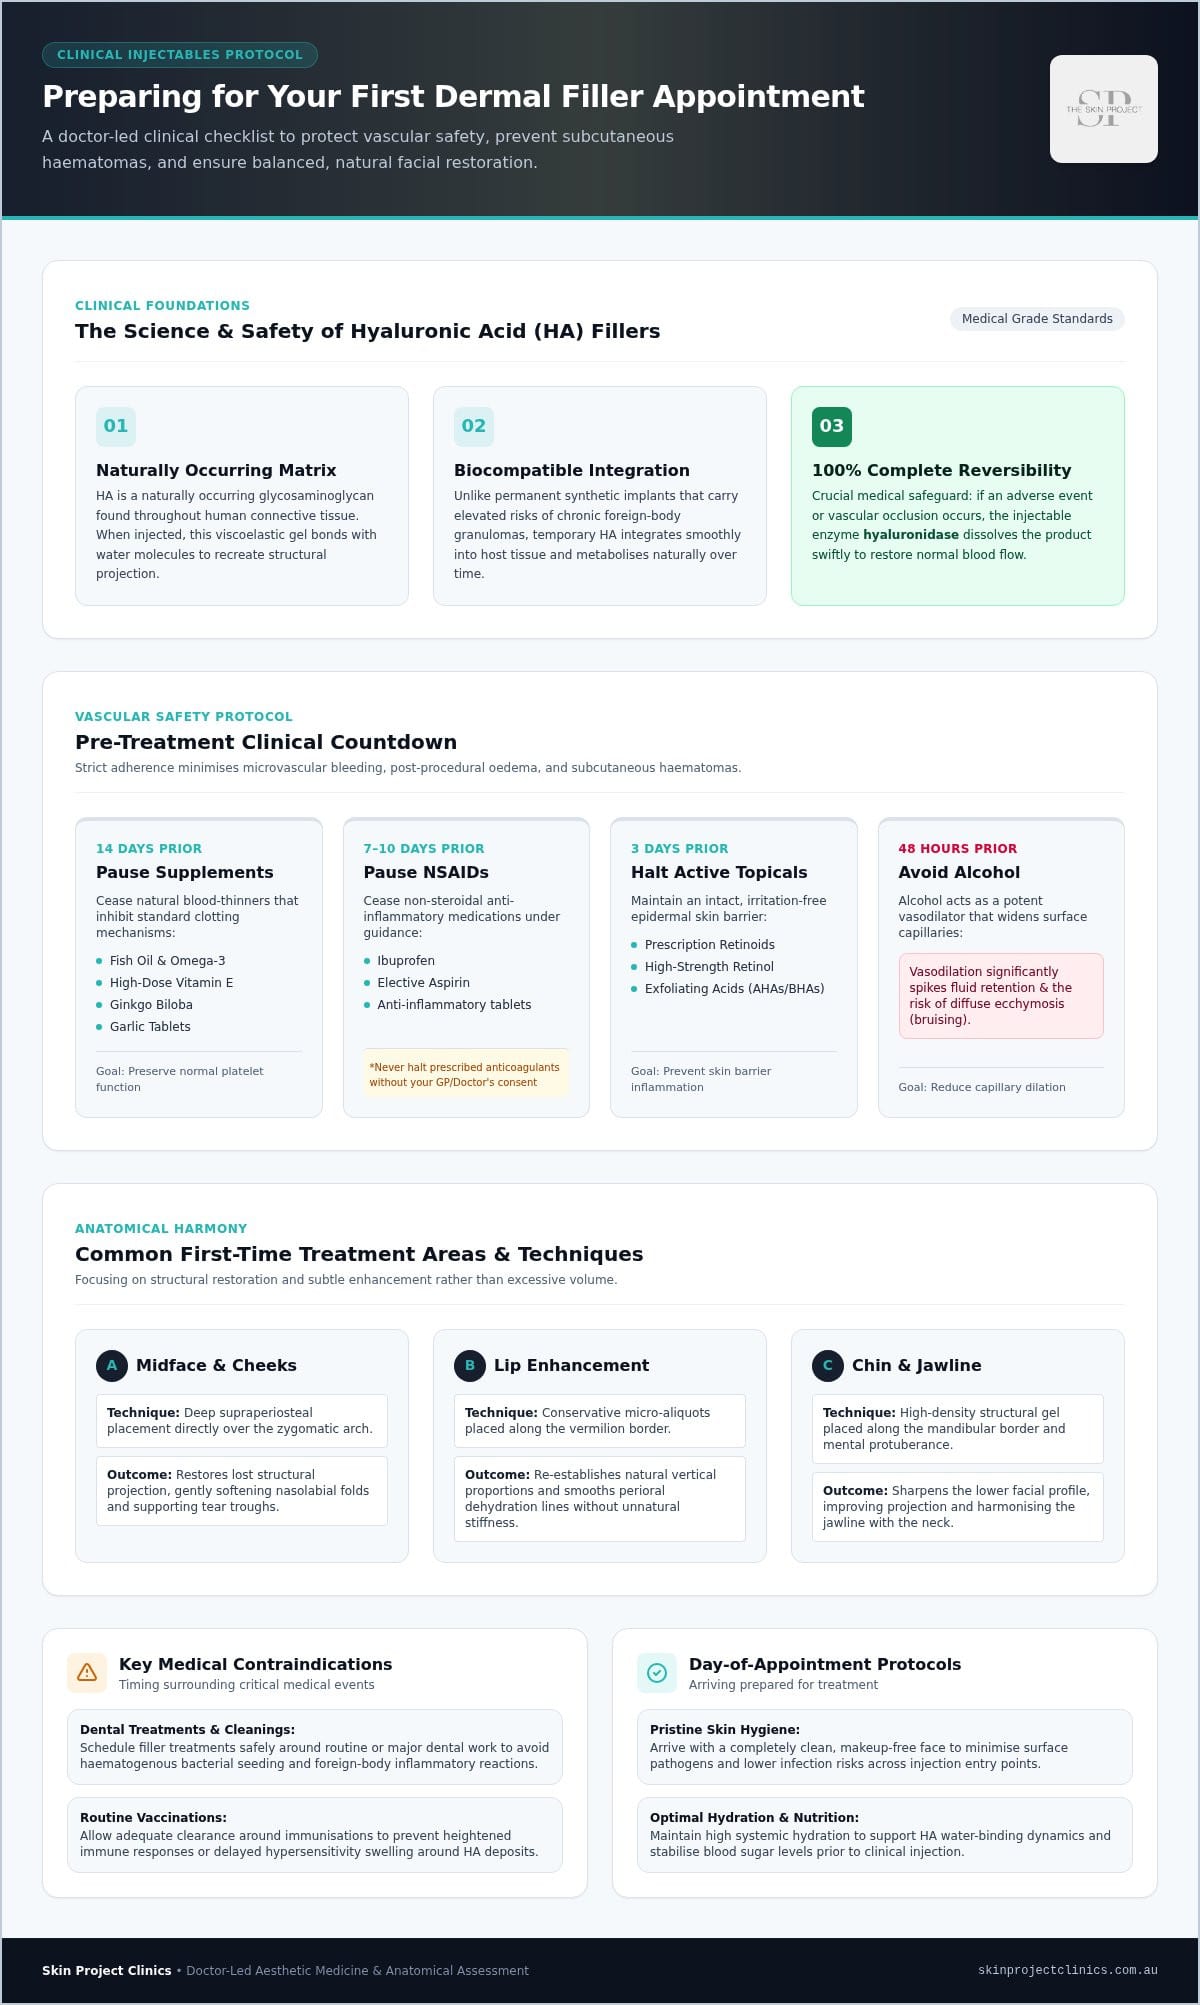
Modern clinical practice relies predominantly on hyaluronic acid, a naturally occurring glycosaminoglycan found throughout human connective tissue. When formulated as an injectable filler, this clear, viscoelastic gel bonds with water molecules to recreate youthful structural support and restore depleted volume across targeted facial layers.
Unlike permanent synthetic implants that carry elevated risks of chronic foreign-body granulomas, temporary hyaluronic acid formulations integrate smoothly into host tissue and metabolise naturally over time. They also provide an essential medical safeguard: complete reversibility. If an adverse event or vascular occlusion occurs, the injectable enzyme hyaluronidase dissolves the product swiftly to restore normal blood flow.
Common Treatment Areas for First-Time Patients
First-time procedures focus on anatomical harmony rather than dramatic alteration. Understanding these target zones is an essential part of how to prepare for your first filler appointment:
- Midface and Cheeks: Deep supraperiosteal placement over the zygomatic arch restores lost structural projection, which gently softens nasolabial folds and provides subtle indirect support beneath tired tear troughs.
- Lip Enhancement: Conservative micro-aliquots restore vermilion border definition, smooth perioral dehydration lines, and re-establish natural vertical lip proportions without creating unnatural stiffness or excessive volume.
- Chin and Jawline: High-density gel placed along the mandibular border and mental protuberance sharpens the lower facial profile, improving projection and harmonising the jawline with the neck.
Pre-Appointment Countdown: Two Weeks to 48 Hours Before
Minimising downtime requires proactive physiological preparation. When planning how to prepare for your first filler appointment, adhering to a structured clinical countdown protects delicate microvasculature, moderates post-procedural oedema, and prevents prolonged bruising.
Two Weeks Prior: Medications, Supplements, and Skincare
Fourteen days before treatment, the priority is preserving standard platelet function and vascular stability. Many everyday wellness supplements and non-prescription analgesics act as systemic blood thinners, which substantially increases the risk of subcutaneous haematomas during injection.
- Herbal and dietary supplements: Pause the intake of fish oil, high-dose vitamin E, ginkgo biloba, and garlic tablets, as these compounds inhibit normal clotting mechanisms.
- Anti-inflammatory medications: Cease non-steroidal anti-inflammatory drugs (NSAIDs), such as ibuprofen and elective aspirin, at least seven to ten days prior. Medical disclaimer: If you take prescribed anticoagulant or antiplatelet therapy for cardiovascular health, never discontinue your medication without explicit guidance from your treating medical doctor.
- Active topicals: In line with broad clinical standards and FDA safety guidelines for dermal fillers, maintaining an intact, irritation-free skin barrier is critical. Discontinue prescription retinoids, high-strength retinol, and exfoliating chemical acids (AHAs and BHAs) three days before treatment.
48 Hours Prior: Alcohol, Lifestyle, and Skin Health
The 48 hours immediately preceding your procedure require targeted vascular management. Alcohol is a potent vasodilator. It widens surface capillaries and promotes excess fluid retention, which spikes the likelihood of diffuse post-treatment ecchymosis (bruising).
- Alcohol cessation: Eliminate all alcohol intake for at least 24 to 48 hours before entering the clinic.
- Exercise moderation: Suspend high-intensity cardiovascular training and strenuous weightlifting. Vigorous exertion elevates systemic blood pressure and stimulates facial flushing, which exacerbates acute inflammatory swelling.
- Epidermal monitoring: Reschedule your appointment if you develop active cold sores, acute acne breakouts, or bacterial infections near the treatment site. Breaching infected skin introduces surface pathogens into deep anatomical planes.
Every face presents unique vascular anatomy. Consulting an experienced, doctor-led practice such as Skin Project Clinics ensures your preparation is tailored precisely to your medical background, safeguarding your final cosmetic result.
Medical Considerations and Candidacy: What Your Doctor Needs to Know
A thorough clinical assessment safeguards against preventable complications. As you consider how to prepare for your first filler appointment under Australian medical standards, patient transparency is just as critical as the injector’s technique. Your cosmetic doctor must evaluate systemic variables, including active autoimmune disorders, connective tissue conditions, and current medications, before deeming you suitable for treatment.
Certain conditions represent absolute contraindications. Dermal fillers are strictly avoided during pregnancy and breastfeeding due to a lack of safety data. Similarly, active skin infections or unmanaged neuromuscular disorders preclude injectable treatments. Qualified medical practitioners conduct detailed anatomical analysis to navigate complex danger zones, such as the facial and angular arteries, ensuring safe gel placement.
The Critical Timing of Dental Procedures and Vaccines
Dental appointments and aesthetic injectables do not mix. Routine dental scale-and-cleans, extractions, or periodontal work release oral bacteria into the bloodstream. This transient bacteremia allows circulating microbes to seed around freshly injected hyaluronic acid, potentially triggering delayed-onset biofilms or chronic inflammatory nodules.
- The dental buffer: Maintain a strict two-week window before and after any dental procedure.
- Immunisations and systemic illness: Allow at least two weeks between receiving routine vaccines or recovering from systemic viral infections and having dermal filler placed. An overstimulated immune system can provoke sudden hypersensitivity reactions at the injection site.
Disclosing Medical History and Previous Aesthetic Work
Past interventions permanently alter subcutaneous tissue planes. If you have previously received permanent synthetic fillers, non-absorbable threads, or surgical interventions, your doctor must know. Placing hyaluronic acid near legacy synthetic products risks late-stage foreign-body granulomas.
Viruses require proactive medical planning. Patients prone to facial herpes simplex (cold sores) risk acute viral reactivation from local needle trauma around the perioral zone. Your doctor can prescribe prophylactic oral antivirals to prevent an outbreak. For broad procedural expectations, consult trusted clinical references like dermatologist-provided filler FAQs.
Finally, disclose any plans for adjunct treatments. Combining volume restoration with neuromodulators, such as anti-wrinkle injections, requires coordinated clinical sequencing. Staging these procedures correctly prevents unexpected product displacement and achieves a balanced, harmonious facial rejuvenation.
Day of Your Appointment: What to Expect and How to Arrive
Arriving prepared transforms your clinical experience. When learning how to prepare for your first filler appointment on the day itself, small physical preparations make a substantial clinical difference. Upon arrival at a doctor-led clinic, the consultation begins with clinical photography. Standardised medical photographs capture multi-angle baseline images in neutral lighting. These records ensure precise anatomical tracking, objectively evaluate facial symmetry, and guide ongoing refinement.
Preparing Your Face and Body on the Morning Of
Your morning routine should be stripped back to basic hygiene:
- Attend bare-faced: Arrive with completely clean skin. Avoid foundations, concealers, tinted moisturisers, and active serums. Penetrating the dermis through cosmetic pigments drags surface contaminants into deeper tissue planes, escalating post-injection infection risks.
- Eat a balanced meal: Hypoglycaemia heightens physiological stress. Consuming a nourishing meal an hour before your appointment stabilises blood sugar levels and prevents vasovagal lightheadedness during treatment.
- Limit morning caffeine: High doses of caffeine act as a stimulant, quickening your pulse and increasing nervous sensitivity. Stick to water or herbal tea to keep dermal tissue hydrated.
Managing Procedural Sensation and Comfort
Patient comfort is managed through calibrated clinical stages. First, a high-strength, compounded topical anaesthetic cream is applied across the treatment site for 20 to 30 minutes, effectively numbing cutaneous nerve endings.
Modern injection techniques further minimise procedural discomfort. Experienced practitioners frequently utilise blunt-tipped micro-cannulas instead of repeated hypodermic needle punctures. Cannulas glide through anatomical planes smoothly, dramatically reducing tissue trauma, swelling, and bruising. Premium dermal fillers also contain integrated lidocaine, which instantly desensitises internal tissue as the gel is deposited.
If you’re ready to explore subtle, precise facial restoration, book a doctor-led consultation at Skin Project Clinics to discuss your tailored treatment plan.
Immediate Post-Treatment Reality: Downtime, Aftercare, and Follow-Up
Understanding recovery expectations is a core component of knowing how to prepare for your first filler appointment. Injectable treatments induce controlled micro-trauma. Expect transient erythema, localised tenderness, and minor asymmetric fullness as initial inflammation develops. Hyaluronic acid naturally draws water into surrounding cells, which can make the area appear slightly overfilled for the first few days before settling into its true anatomical contour.
The First 48 Hours: Protecting Your Investment
The first two days require disciplined aftercare to preserve gel placement and facilitate tissue integration:
- Sleep positioning: Sleep supine with your head elevated on an extra pillow. Avoid sleeping face-down or resting against your cheeks, as continuous mechanical pressure can shift newly placed product before it stabilises.
- Thermal control: Avoid saunas, steam rooms, spas, and hot yoga. Elevated ambient heat dilates superficial blood vessels, which prolongs swelling and worsens bruising.
- Treatment spacing: Defer advanced dermal resurfacing procedures, such as Fraxel laser treatment, for at least two to four weeks. Staging treatments prevents excessive thermal stress across healing subcutaneous planes.
Recognising Normal Healing vs. Clinical Red Flags
Distinguishing standard inflammatory responses from vascular emergencies is vital when evaluating how to prepare for your first filler appointment. Normal swelling typically peaks between 24 and 48 hours post-procedure before subsiding steadily over the following week. Bruising shifts naturally through purplish and yellowish hues before fully resolving.
Certain signs demand urgent medical attention. Severe blanching (pale, bloodless skin patches), livedo reticularis (a distinctive, purplish reticulated pattern), or severe, escalating pain that throbs persistently are clinical indicators of vascular compromise. These symptoms require immediate medical assessment and prompt enzyme reversal if necessary.
Complete tissue integration takes up to two full weeks. At our North Sydney clinic, we schedule a formal doctor-led clinical review at the fourteen-day mark. This consultation allows your doctor to evaluate final product integration, review facial symmetry, and ensure your outcome reflects subtle, balanced restoration.
Taking the Next Step Toward Refined Facial Balance
Mastering how to prepare for your first filler appointment transforms an unfamiliar procedure into a predictable, reassuring clinical experience. Following a structured countdown, pausing platelet-inhibiting supplements, and respecting essential healing intervals around routine dental appointments directly safeguards your vascular health. This disciplined pre-treatment diligence minimises post-procedural downtime and lays the groundwork for seamless, natural tissue restoration.
Lasting aesthetic outcomes depend entirely on clinical precision and anatomical expertise. At Skin Project Clinics, all consultations and treatments are performed exclusively by experienced medical doctors adhering strictly to Australian medical and anatomical safety protocols. Conveniently located in North Sydney and serving patients across the Lower North Shore, including Crows Nest and Kirribilli, our clinic focuses on delicate structural balance rather than artificial overfilling. When you feel ready to restore volume with quiet confidence, book a doctor-led consultation at Skin Project Clinics to begin your bespoke clinical journey.
Frequently Asked Questions
Does getting dermal fillers hurt for a first-time patient?
Discomfort is minimal and highly tolerable. Clinics apply a clinical-strength topical anaesthetic cream beforehand to numb the target dermal layer. Premium hyaluronic acid gels also contain integrated lidocaine, which numbs the tissues immediately upon administration. Many areas are treated using smooth micro-cannulas rather than sharp needles, further reducing painful sensations to a mild, dull pressure during the procedure.
How far in advance of an important event should I book my appointment?
Schedule your appointment at least three to four weeks before any major social or professional engagement. While acute post-treatment swelling subsides within several days, microscopic tissue integration and capillary healing take up to a fortnight. Planning ahead is a vital rule when researching how to prepare for your first filler appointment, giving residual haematomas ample time to fade and allowing for a comprehensive two-week clinical review.
Can I take paracetamol before my filler appointment if I am nervous?
Yes, paracetamol is medically safe to take prior to treatment. Unlike non-steroidal anti-inflammatory drugs like ibuprofen, paracetamol does not interfere with platelet aggregation or prolong coagulation times. If you feel apprehensive about procedural discomfort, taking standard paracetamol an hour before arriving at our North Sydney clinic can help manage sensation without increasing your risk of subcutaneous bleeding.
How long does swelling and bruising typically last after facial fillers?
Mild swelling and localised bruising generally peak within 24 to 48 hours before resolving steadily over five to seven days. Anatomical areas with extensive microvasculature, such as the lips, tend to hold fluid slightly longer than deep structural sites like the chin or jawline. Strictly following pre-procedural advice regarding alcohol and blood-thinning supplements substantially shortens this inflammatory period.
What should I do if I am prone to cold sores and want lip filler?
Notify your cosmetic doctor well in advance so they can prescribe a prophylactic course of oral antiviral medication. Mechanical needle punctures can trigger the herpes simplex virus along the perioral border. When evaluating how to prepare for your first filler appointment, starting antiviral tablets one to two days before your visit suppresses viral replication and ensures a safe, uninterrupted recovery.
Can I wear makeup immediately after my dermal filler treatment?
No, keep your skin completely bare for at least 24 hours post-treatment. Each needle or cannula entry site leaves a microscopic transdermal channel that remains vulnerable to external debris. Applying foundation, concealer, or makeup sponges introduces pathogenic bacteria into these healing entry points, creating a significant risk of localised superficial infection or deeper inflammatory reactions.
How long will my dermal filler results last once settled?
Hyaluronic acid filler longevity typically ranges from six to eighteen months depending on the anatomical area, the structural density of the product, and your individual metabolic rate. High-movement regions like the lips metabolise filler faster than immobile zones like the cheeks or chin. During consultations at our Lower North Shore practice, our doctors explain realistic retention expectations for your specific treatment plan.